tomcat的https配置
下载tomcat使用证书.
修改配置文件(配置跳转)
应用建议:
tomcat可以支持https,可以在tomcat中配置https证书.
未来可以在nginx中配置证书加密,tomcat未加密
添加域名解析
到自己的域名解析商处,添加一条A记录指向你的服务器IP即可
申请证书
使用刚才添加的域名申请一个SSL证书;

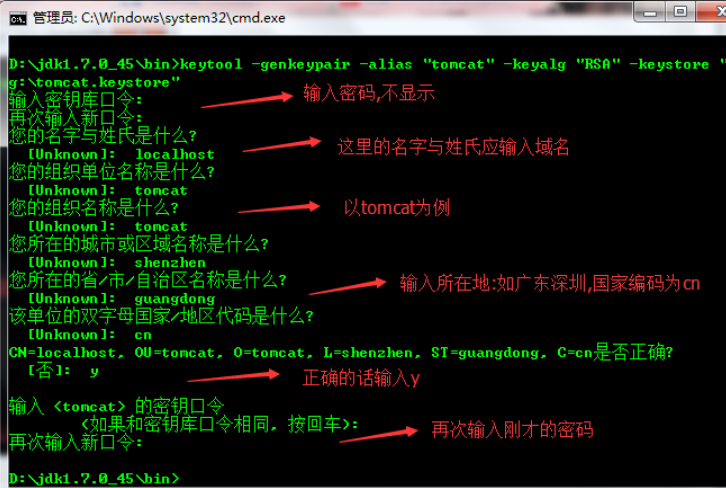
这边介绍一个生产开发环境证书的方式:使用 Java 提供的工具:keytool
keytool -genkeypair -alias "tomcat" -keyalg "RSA" -keystore "d:\tomcat.keystore"

上传证书
在tomcat目录新建一个ssl目录,将证书文件上传到这个目录;
[root@node1 ~]# cd /usr/local/tomcat/
[root@node1 tomcat]# mkdir ssl
[root@node1 tomcat]# rz
修改server.xml
VIM打开server.xml,添加ssl连接器,在8080端口连接器下面添加如下配置:
<Connector port="443" protocol="HTTP/1.1" SSLEnabled="true"
    maxThreads="150" scheme="https" secure="true"
    keystoreFile="/usr/local/tomcat/ssl/YourDomain.jks"
    keystorePass="SSLPass"
    clientAuth="false" sslProtocol="TLS" />
注意:
    keystoreFile :证书存放目录,可以写绝对路径或Tomcat相对路径;
    keystorePass:证书私钥密码;
修改HOST配置
    <Engine name="Catalina" defaultHost="localhost">
## 这里指定的localhost是默认HOST的名称,修改为证书绑定的域名即可

      <!--For clustering, please take a look at documentation at:
          /docs/cluster-howto.html  (simple how to)
          /docs/config/cluster.html (reference documentation) -->
      <!--
      <Cluster className="org.apache.catalina.ha.tcp.SimpleTcpCluster"/>
      -->

      <!-- Use the LockOutRealm to prevent attempts to guess user passwords
           via a brute-force attack -->
      <Realm className="org.apache.catalina.realm.LockOutRealm">
        <!-- This Realm uses the UserDatabase configured in the global JNDI
             resources under the key "UserDatabase".  Any edits
             that are performed against this UserDatabase are immediately
             available for use by the Realm.  -->
        <Realm className="org.apache.catalina.realm.UserDatabaseRealm"
               resourceName="UserDatabase"/>
      </Realm>
      <Host name="localhost"  appBase="webapps"
### 将这里的localhost修改Wie刚才添加解析的域名即可,且必须与证书的通用名称保持一致
            unpackWARs="true" autoDeploy="true">

        <!-- SingleSignOn valve, share authentication between web applications
             Documentation at: /docs/config/valve.html -->
        <!--
        <Valve className="org.apache.catalina.authenticator.SingleSignOn" />
        -->

        <!-- Access log processes all example.
             Documentation at: /docs/config/valve.html
             Note: The pattern used is equivalent to using pattern="common" -->
        <Valve className="org.apache.catalina.valves.AccessLogValve" directory="logs"
               prefix="localhost_access_log" suffix=".txt"
               pattern="%h %l %u %t "%r" %s %b" />

      </Host>
这里只需要将里两个localhost修改为证书绑定域名即可,也就是是将该域名与此HOST绑定;
重启tomcat
[root@node1 tomcat]# catalina.sh start
检查端口
[root@node1 tomcat]# ss -ntl
测试访问
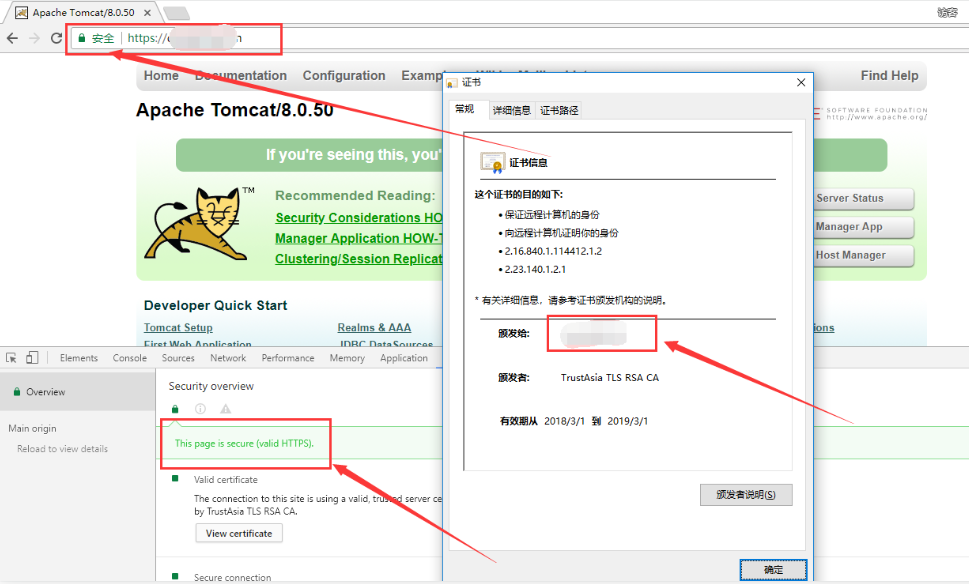
用浏览器访问显示小绿锁,F12查看,提示:This is secure (valid HTTPS),说明证书已经配置成功

配置HTTP自动跳转HTTPS
修改web.xml
在后面,也就是倒数第二行里,加上如下配置:
<login-config>
    <!-- Authorization setting for SSL -->
    <auth-method>CLIENT-CERT</auth-method>
    <realm-name>Client Cert Users-only Area</realm-name>
    </login-config>
    <security-constraint>
    <!-- Authorization setting for SSL -->
    <web-resource-collection>
    <web-resource-name>SSL</web-resource-name>
    <url-pattern>/*</url-pattern>
    </web-resource-collection>
    <user-data-constraint>
    <transport-guarantee>CONFIDENTIAL</transport-guarantee>
    </user-data-constraint>
    </security-constraint>
修改server.xml
修改非SSL连接器的请求跳转到SSL连接器上,修改如下配置:
原来为:
    <Connector port="8080" protocol="HTTP/1.1"
               connectionTimeout="20000"
               redirectPort="8443" />
修改为:
    <Connector port="80" protocol="HTTP/1.1"
               connectionTimeout="20000"
               redirectPort="443" />


★将默认8080端口修改为80端口,访问时就不需要加8080端口了,因为HTTP协议默认走的是80端口;
★将8443端口修改为443端口,意思是来自80端口的请求都跳转至443端口;
重启服务-检查端口
[root@node1 conf]# ss -nlt
测试访问
[root@node1 ~]# curl  http://YourDomain/  -I
HTTP/1.1 302 Found
Server: Apache-Coyote/1.1
Cache-Control: private
Expires: Thu, 01 Jan 1970 08:00:00 CST
Location: https://YourDomain/
Transfer-Encoding: chunked
Date: Fri, 13 Apr 2018 16:06:04 GMT

