nginx 端口域名IP+其余配置
虚拟主机
Nginx配置虚拟主机有如下三种方式:
方式一、基于主机多IP方式
方式二、基于端口的配置方式
方式三、基于多个hosts名称方式(多域名方式)
多IP虚拟主机

# 添加虚拟IP
ip addr add 10.0.0.11/24 dev eth0
ip addr add 10.0.0.12/24 dev eth0
# 查看ip
[root@web01 code]# ip a
2: eth0: <BROADCAST,MULTICAST,UP,LOWER_UP> mtu 1500 qdisc pfifo_fast state UP
group default qlen 1000
link/ether 00:0c:29:1d:4d:9a brd ff:ff:ff:ff:ff:ff
inet 10.0.0.7/24 brd 10.0.0.255 scope global noprefixroute eth0
valid_lft forever preferred_lft forever
inet 10.0.0.11/24 scope global secondary eth0
valid_lft forever preferred_lft forever
inet 10.0.0.12/24 scope global secondary eth0
valid_lft forever preferred_lft forever

## 编写基于ip访问的配置文件
vim /etc/nginx/conf.d/7.conf
server{
	listen 80;
	server_name 10.0.0.7;
	root /7;
	index index.html;
}
vim /etc/nginx/conf.d/11.conf
server{
	listen 80;
	server_name 10.0.0.11;
	root /11;
	index index.html;
}
vim /etc/nginx/conf.d/12.conf
server{
	listen 80;
	server_name 10.0.0.12;
	root /12;
index index.html;
}

# 检测nginx语法
nginx -t
nginx: the configuration file /etc/nginx/nginx.conf syntax is ok
nginx: configuration file /etc/nginx/nginx.conf test is successful
# 准备站点目录
[root@web01 conf.d]# mkdir /7
[root@web01 conf.d]# mkdir /11
[root@web01 conf.d]# mkdir /12
# 准备三个索引文件
[root@web01 conf.d]# echo 7 > /7/index.html
[root@web01 conf.d]# echo 11 > /11/index.html
[root@web01 conf.d]# echo 12 > /12/index.html
# 重启nginx
systemctl restart nginx
systemctl reload nginx
# 浏览器访问
10.0.0.7
10.0.0.11
10.0.0.12
多端口的配置方式
# 编辑配置文件 修改器端口
vim /etc/nginx/conf.d/1.conf
server{
	listen 80;
	server_name 10.0.0.7;
	root /7;
	index index.html;
}

vim /etc/nginx/conf.d/2.conf
server{
	listen 90;
	server_name 10.0.0.7;
	root /11;
	index index.html;
}
vim /etc/nginx/conf.d/3.conf
server{
	listen 8080;
	server_name 10.0.0.7;
	root /12;
	index index.html;
}

# 检测语法
nginx -t

# 重启nginx
systemctl restart nginx

# 检测端口
[root@web01 conf.d]# netstat -lntup | grep 80
tcp 0 0 0.0.0.0:8080 0.0.0.0:* LISTEN 20935/nginx: master
tcp 0 0 0.0.0.0:80 0.0.0.0:* LISTEN 20935/nginx: master
[root@web01 conf.d]# netstat -lntup | grep 90
tcp 0 0 127.0.0.1:9000 0.0.0.0:* LISTEN 9028/php-fpm: maste
tcp 0 0 0.0.0.0:90 0.0.0.0:* LISTEN 20935/nginx: master
[root@web01 conf.d]# netstat -lntup | grep 8080
tcp 0 0 0.0.0.0:8080 0.0.0.0:* LISTEN 20935/nginx: master


# 修改索引文件
[root@web01 conf.d]# echo 90 > /11/index.html
[root@web01 conf.d]# echo 8080 > /12/index.html

# 浏览器访问
10.0.0.7
10.0.0.7:90
10.0.0.7:8080
# 注意点启动的端口范围1-65535
# 注意点 启动端口不要和本地现在启动的端口冲突
比如 3306 9000 22
多域名模式
# 编写配置文件
vim /etc/nginx/conf.d/1.conf
server{
	listen 80;
	server_name 1.hh.com;
	root /7;
	index index.html;
}
vim /etc/nginx/conf.d/2.conf
server{
	listen 80;
	server_name 2.hh.com;
	root /11;
	index index.html;
}
vim /etc/nginx/conf.d/3.conf
server{
	listen 80;
	server_name 3.hh.com;
	root /12;
	index index.html;
}
# 检测nginx语法
nginx -t
nginx: the configuration file /etc/nginx/nginx.conf syntax is ok
nginx: configuration file /etc/nginx/nginx.conf test is successful

# 重启nginx
systemctl restart nginx
# 本地DNS解析
10.0.0.7 1.hh.com 2.hh.com 3.hh.com

## 修改windos域名
(C:\Windows\System32\drivers\etc\hosts

# 浏览器访问
http://1.hh.com/
http://2.hh.com/
http://3.hh.com/
nginx模块
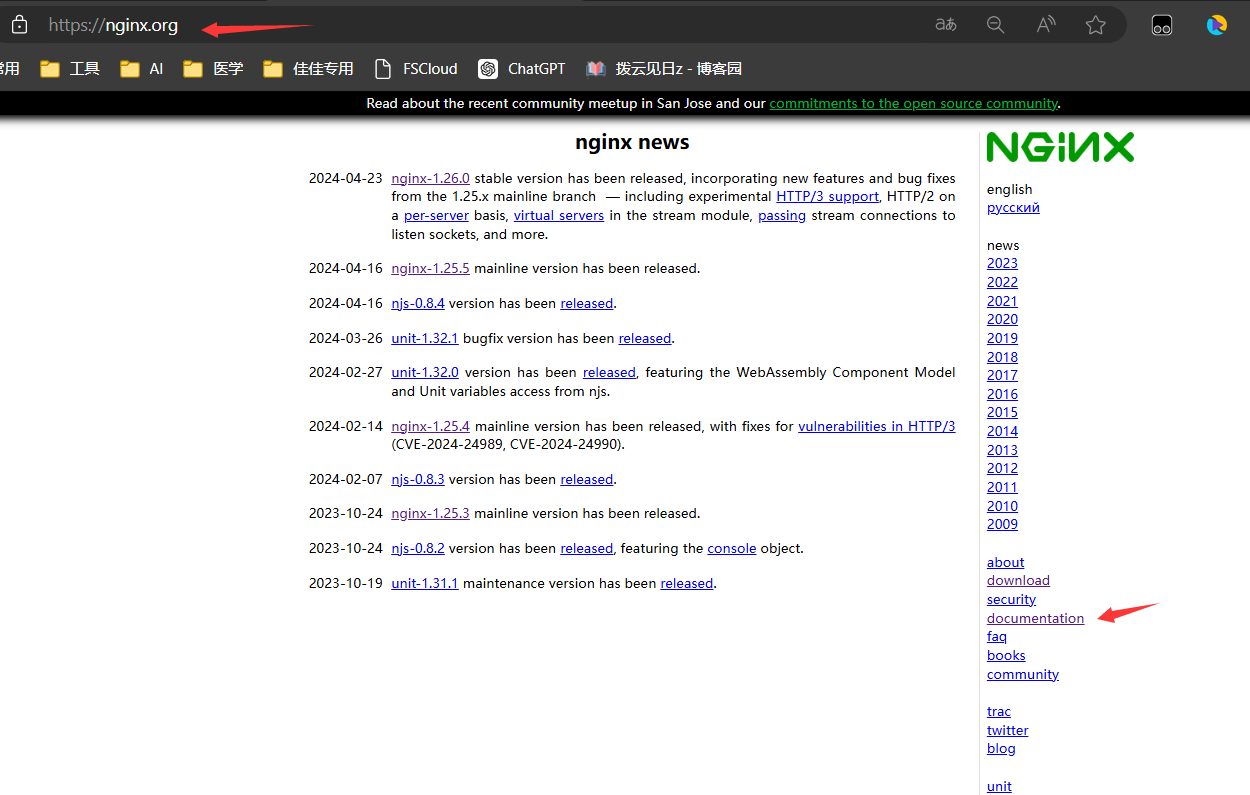
在官网(nginx.org)的 右侧的documentation(评注)下

(index.html)目录索引模块
# 先准备nginx网页配置
vim /etc/nginx/conf.d/test.conf
server{
	listen 80;
	server_name 10.0.0.7;
	root /test;
	index index.html;
}
# 创建站点目录
mkdir /test
# 准备索引文件
[root@web01 conf.d]# echo test > /test/index.html
[root@web01 conf.d]# cat /test/index.html
test
# 检测nginx语法
nginx -t
# 重启nginx
systemctl restart nginx
# 浏览器访问
10.0.0.7

(autoindex)配置目录索引模块
当 ngx_http_index_module 模块找不到索引文件时,通常会将请求传递给
ngx_http_autoindex_module 模块。
Syntax: autoindex on | off;
Default:
autoindex off;
Context: http, server, location

off 显示文件的大概大小
on 显示文件的具体大小

# 修改配置文件 加上了autoindex模块
server{
	listen 80;
	server_name 10.0.0.7;
		location / {
		root /test;
		index index.html;
		autoindex on;
		}
}
# 检查语法
nginx -t
# 重启nginx
systemctl restart nginx
# 找不到索引文件
# 在你的站点目录下不能有index.html
mv /test/index.html /opt
# 访问10.0.0.7
10.0.0.7

(autoindex_format)页面显示格式
Syntax: autoindex_format html | xml | json | jsonp;
Default:
autoindex_format html;
Context: http, server, location
# 提供了html格式 xml格式     (json格式 jsonp格式)

# 修改配置文件
## xml
server{
	listen 80;
	server_name 10.0.0.7;
		location / {
		root /test;
		index index.html;  # (目录下不能有index.html)
		autoindex on;
		autoindex_exact_size on;
		autoindex_format xml;
	}
}
# 检测语法
nginx -t
# 重启nginx
systemctl restart nginx
# 访问页面
10.0.0.7

(autoindex_localtime)时间显示模式
Syntax: autoindex_localtime on | off;
Default:
autoindex_localtime off;
Context: http, server, location
on 现实的是找点目录下文件的属性时间
off 显示的是格林威治时间

# 编辑配置文件
server{
	listen 80;
	server_name 10.0.0.7;
		location / {
		root /test;
		index index.html; #(不能存在index.html)
		autoindex on;
		autoindex_exact_size on;
		autoindex_format html;
		autoindex_localtime on;
		}
}
# 检测语法
nginx -t
# 重启nginx
systemctl restart nginx
# 访问浏览器
10.0.0.7


(stub_status)nginx状态模块
server{
	listen 80;
	server_name 10.0.0.7;
		location / {
		root /test;
		index index.html;
		autoindex on;
		autoindex_exact_size on;
		autoindex_format html;
		autoindex_localtime on;
		}
		location = /aaa {  ## 在10.0.0.7/aaa   指定这个
		stub_status;    ## 开始的关键
		}
}
# nginx检测语法
nginx -t
# 重启nginx
systemctl restart nginx
# 访问
10.0.0.7/aaa


Active connections: 2 		  # 当前活动的连接数
accepts 					 # 当前总的连接数 tcp 4
handled 					# 成功的连接数数 4
requests 					# 总的http的请求书数目 51
4 4 51
Reading: 0 					# 请求
Writing: 1 					# 响应
Waiting: 1 					# 等待的请求数

一次tcp请求里面 可以发起多次http的请求
keepalive_timeout 0; 关闭了长连接
keepalive_timeout 65; 65s内网页没有收到请求书就断开tcp连接

(auth_basic)用户的访问控制
location / {
	auth_basic 			"closed site";
	auth_basic_user_file conf/htpasswd;
}
Syntax: auth_basic string | off;
Default:
auth_basic off;
Context: http, server, location, limit_except


# 安装htpasswd
yum install -y httpd
# 创建认证相关的目录
mkdir /etc/nginx/auth
# 创建密码文件
htpasswd -b -c /etc/nginx/auth/xxx.auth xxx 123
-b # 允许命令行输入密码
-c # 创建一个新文件
# 查看密码文件
[root@web01 auth]# cat xxx.auth
xxx:$apr1$LYCDPF82$dFTfxcThQDnQficauLgZ9.
# 修改配置文件
server{
	listen 80;
	server_name 10.0.0.7;
	root /test;
	index index.html;
		location = /aaa {
			stub_status;
		 	auth_basic "input your username & password";
			auth_basic_user_file /etc/nginx/auth/xxx.auth;
		}
}
# 检测nginx
nginx -t
# 重启nginx
systemctl restart nginx
# 浏览器访问
10.0.0.7/aaa
(syntax)用户访问限制
# 用户访问限制模块
Syntax: allow address | CIDR | unix: | all;
Default: —
Context: http, server, location, limit_except
Syntax: deny address | CIDR | unix: | all;
Default: —
Context: http, server, location, limit_except
10.0.0.0/24 255.255.255.0
10.0.0.0/16 255.255.0.0
# 就允许10.0.0.9ip访问 其他拒绝所有
server{
	listen 80;
	server_name _;
	root /test;
	index index.html;
	autoindex on;
	autoindex_exact_size off;
	autoindex_localtime on;
	allow 10.0.0.9;  #(允许)
	deny all;		 #(拒绝)
}


